Zendesk Sunshine
Setting up the account
- Go to your organization's Integrations page in Askribe
- From the Handoff to Agent section, click on the + Account button
-
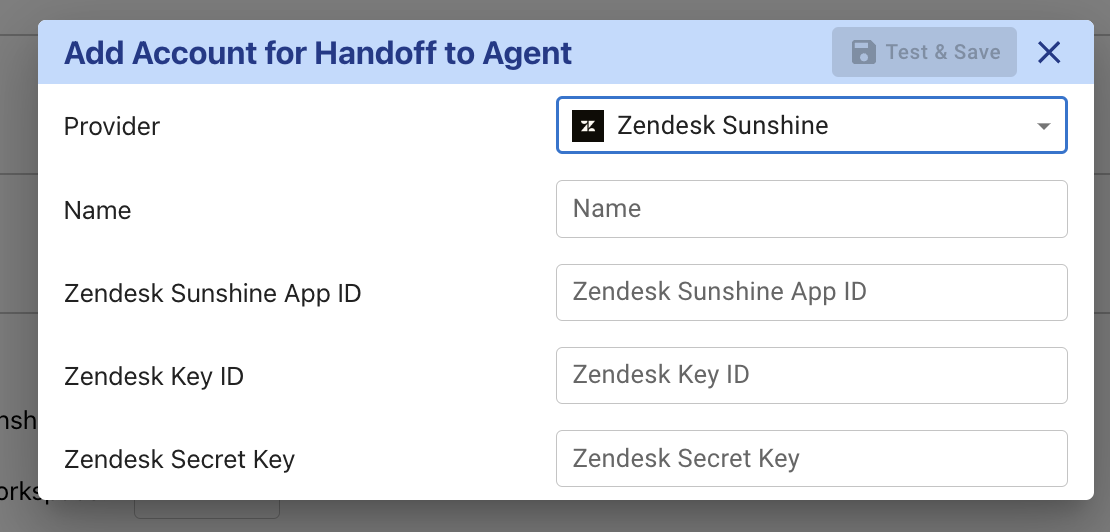
- Give a custom name for your integration.
- To obtain the details for the API connection, go to your Zendesk admin page
- From the Apps and Integrations section, click on Conversations API in the APIS section
-
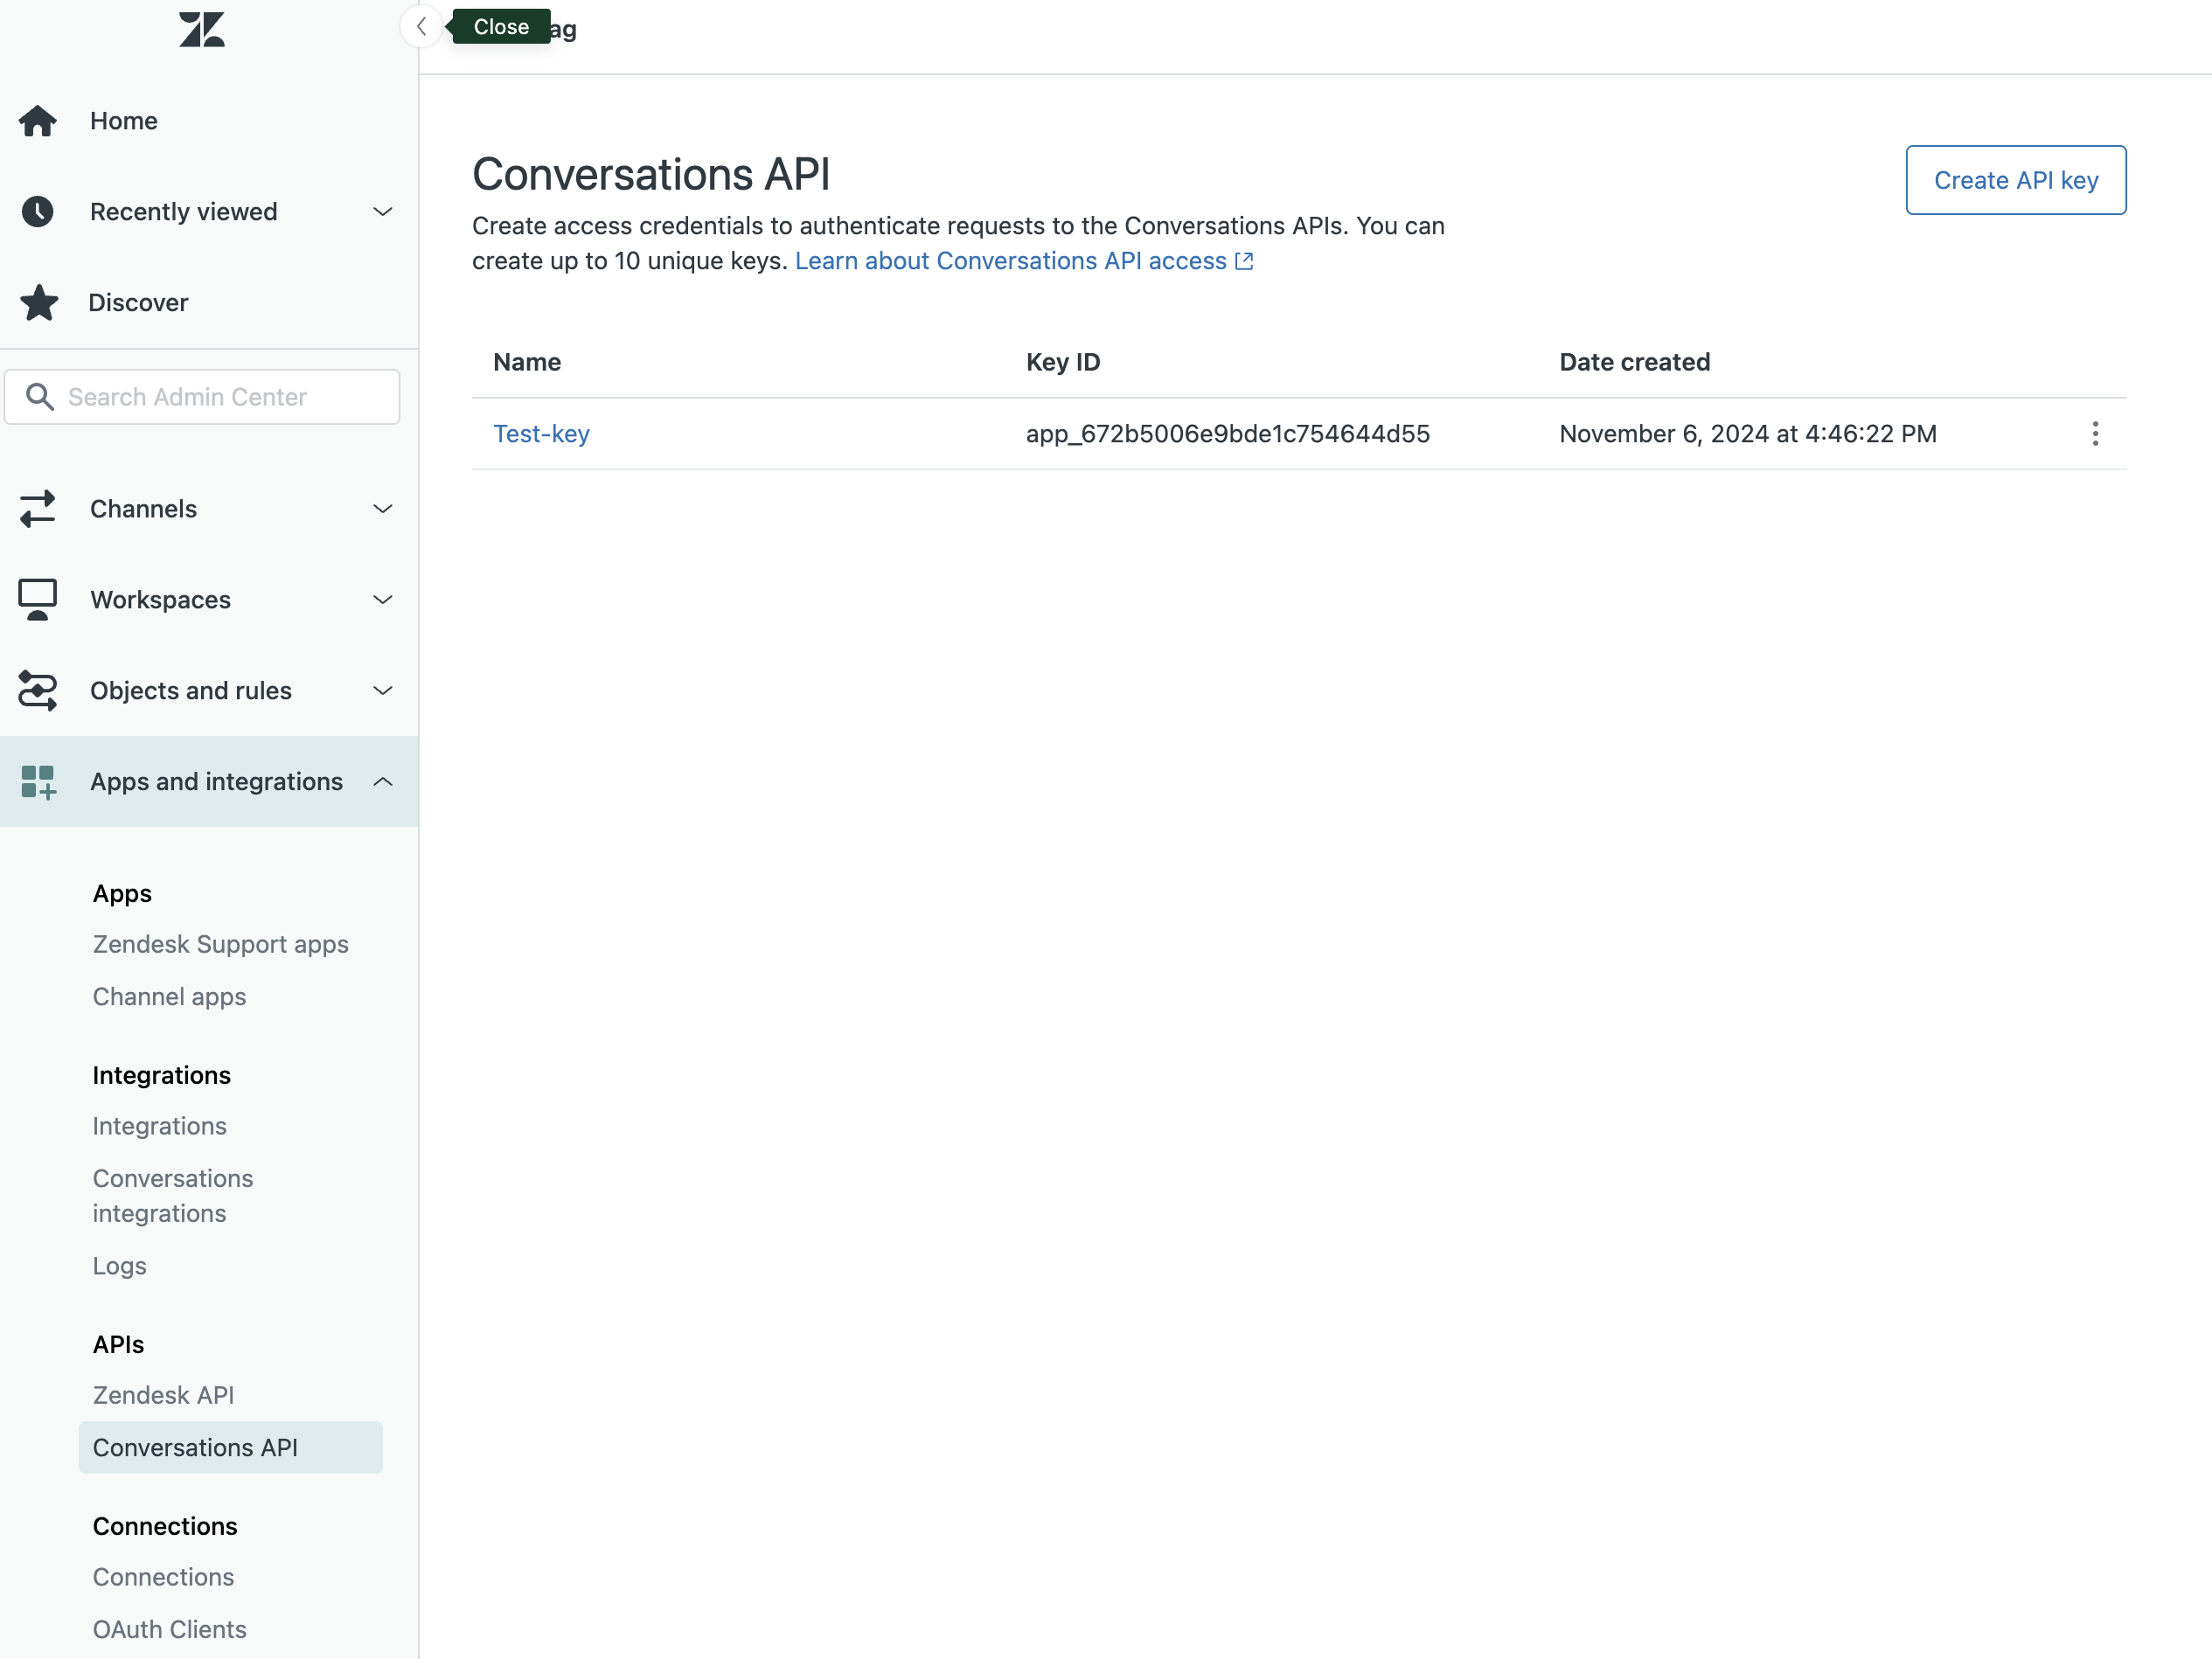
- Click on Create API key button at the top right
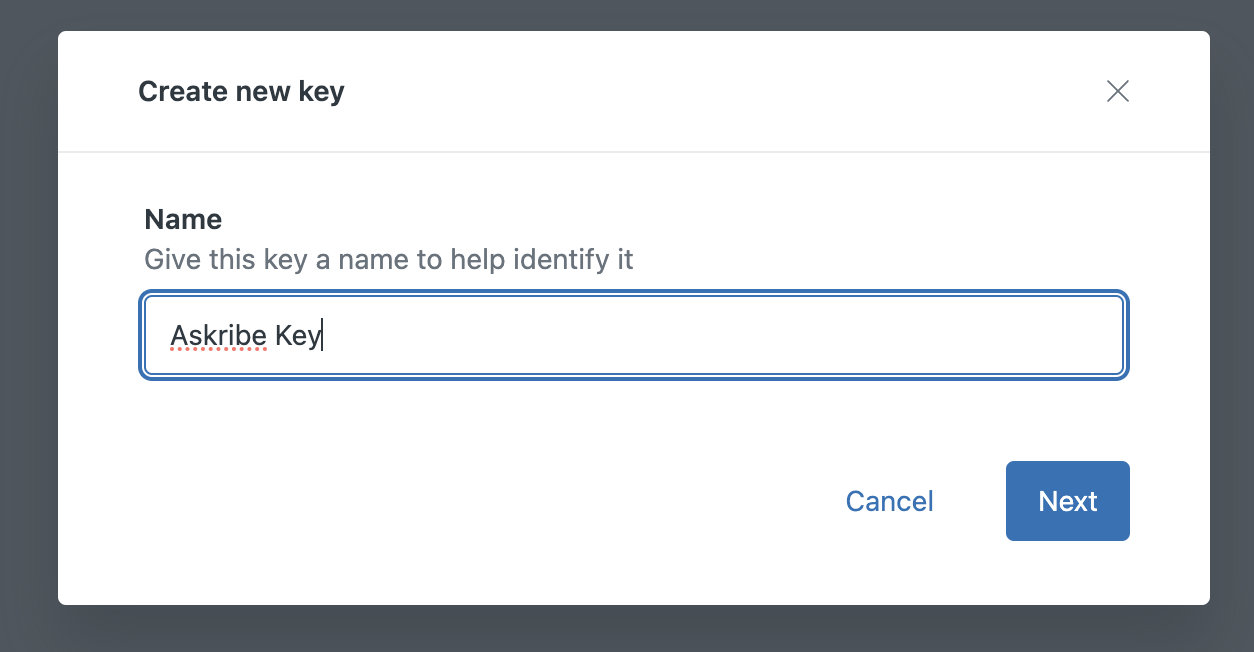
- Give a name for your API key and click on Next
-
- In the next screen, you'll be presented with the following screen:
-

- Copy the App ID, Key ID and Secret Key and paste it in the corresponding fields in the Askribe integrations page. Click on Next in the Zendesk modal to create your API key
- Click on Save in the Askribe integration dialog
- Select the workspace where you want to use this integration
- Click on Save
- That's it! You have successfully connected your Zendesk Sunshine account to Askribe. Now you can use this integration in the Handoff to Agent block in your Conversational flows.
Setting up webhooks
- Go to your Zendesk Sunshine admin page and go the the integrations directory
- Click on Create webhook where you'll be presented with the following screen:
-
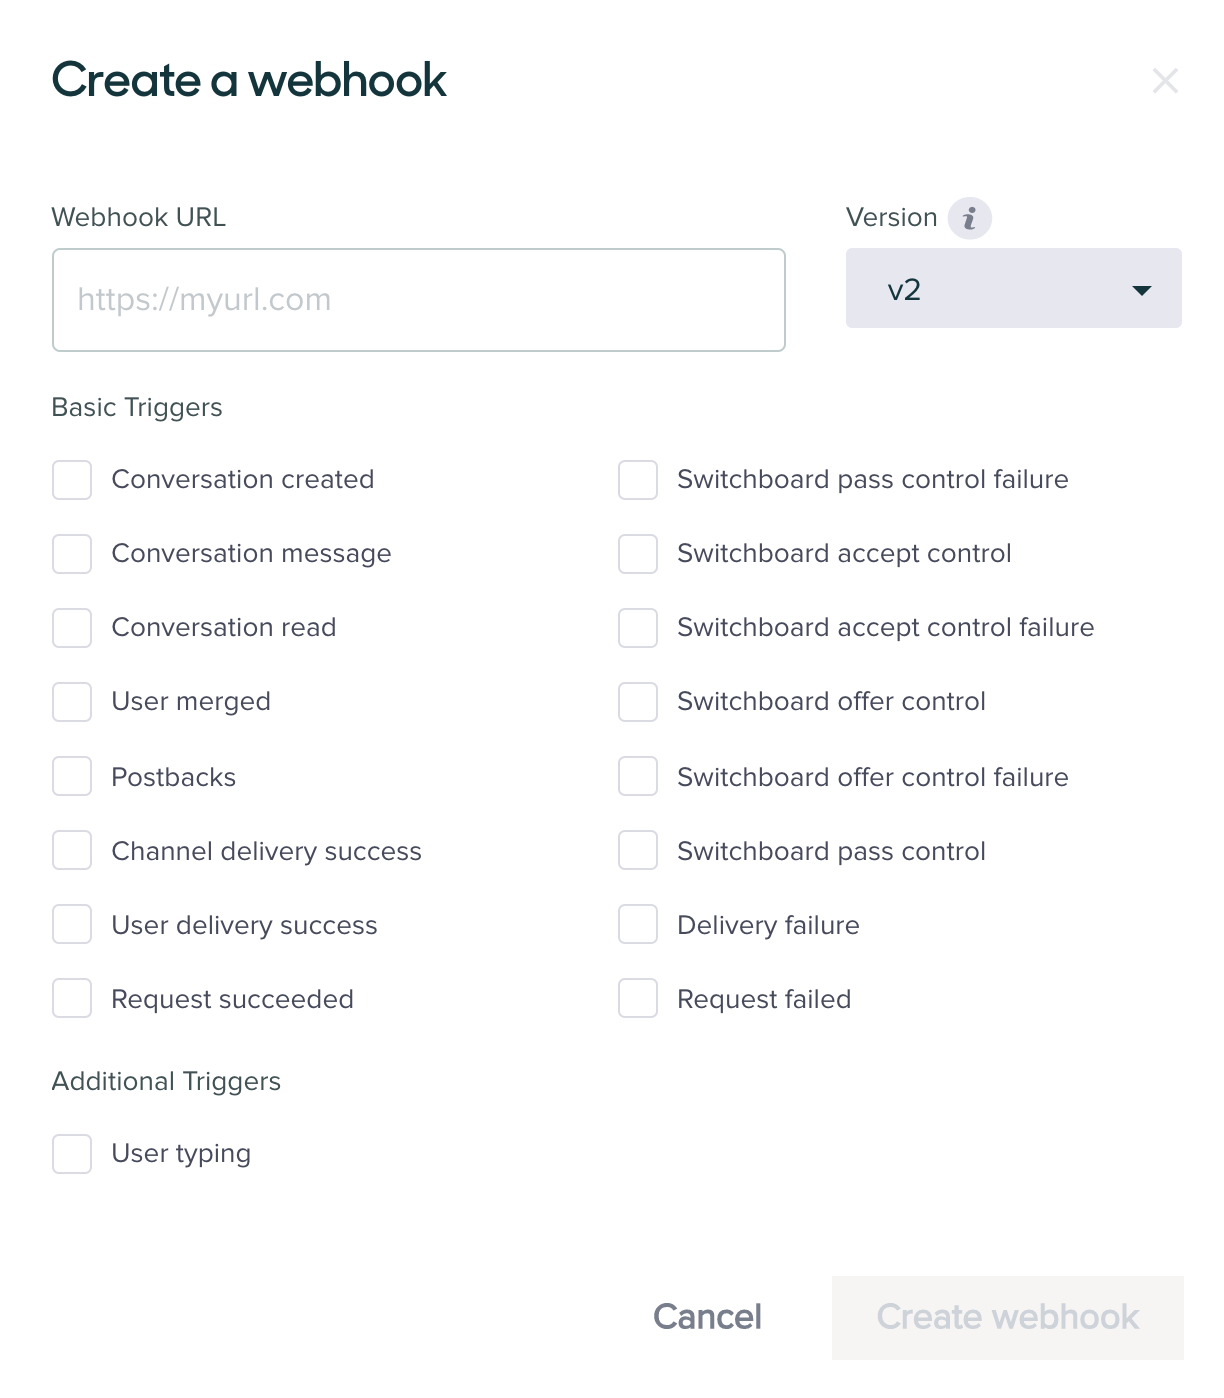
- From the Settings section, select Webhooks
- Put
https://stage-askribe-askribe-ohlibf5r4a-el.a.run.app/api/v1/webhook/zendesk-sunshinein the URL field and check the following topics inBasic Triggers- Conversation created
- Conversation message
- Click on Create webhook and then Save
Handing the conversation back to Askribe
-
Go to your Zendesk admin page
-
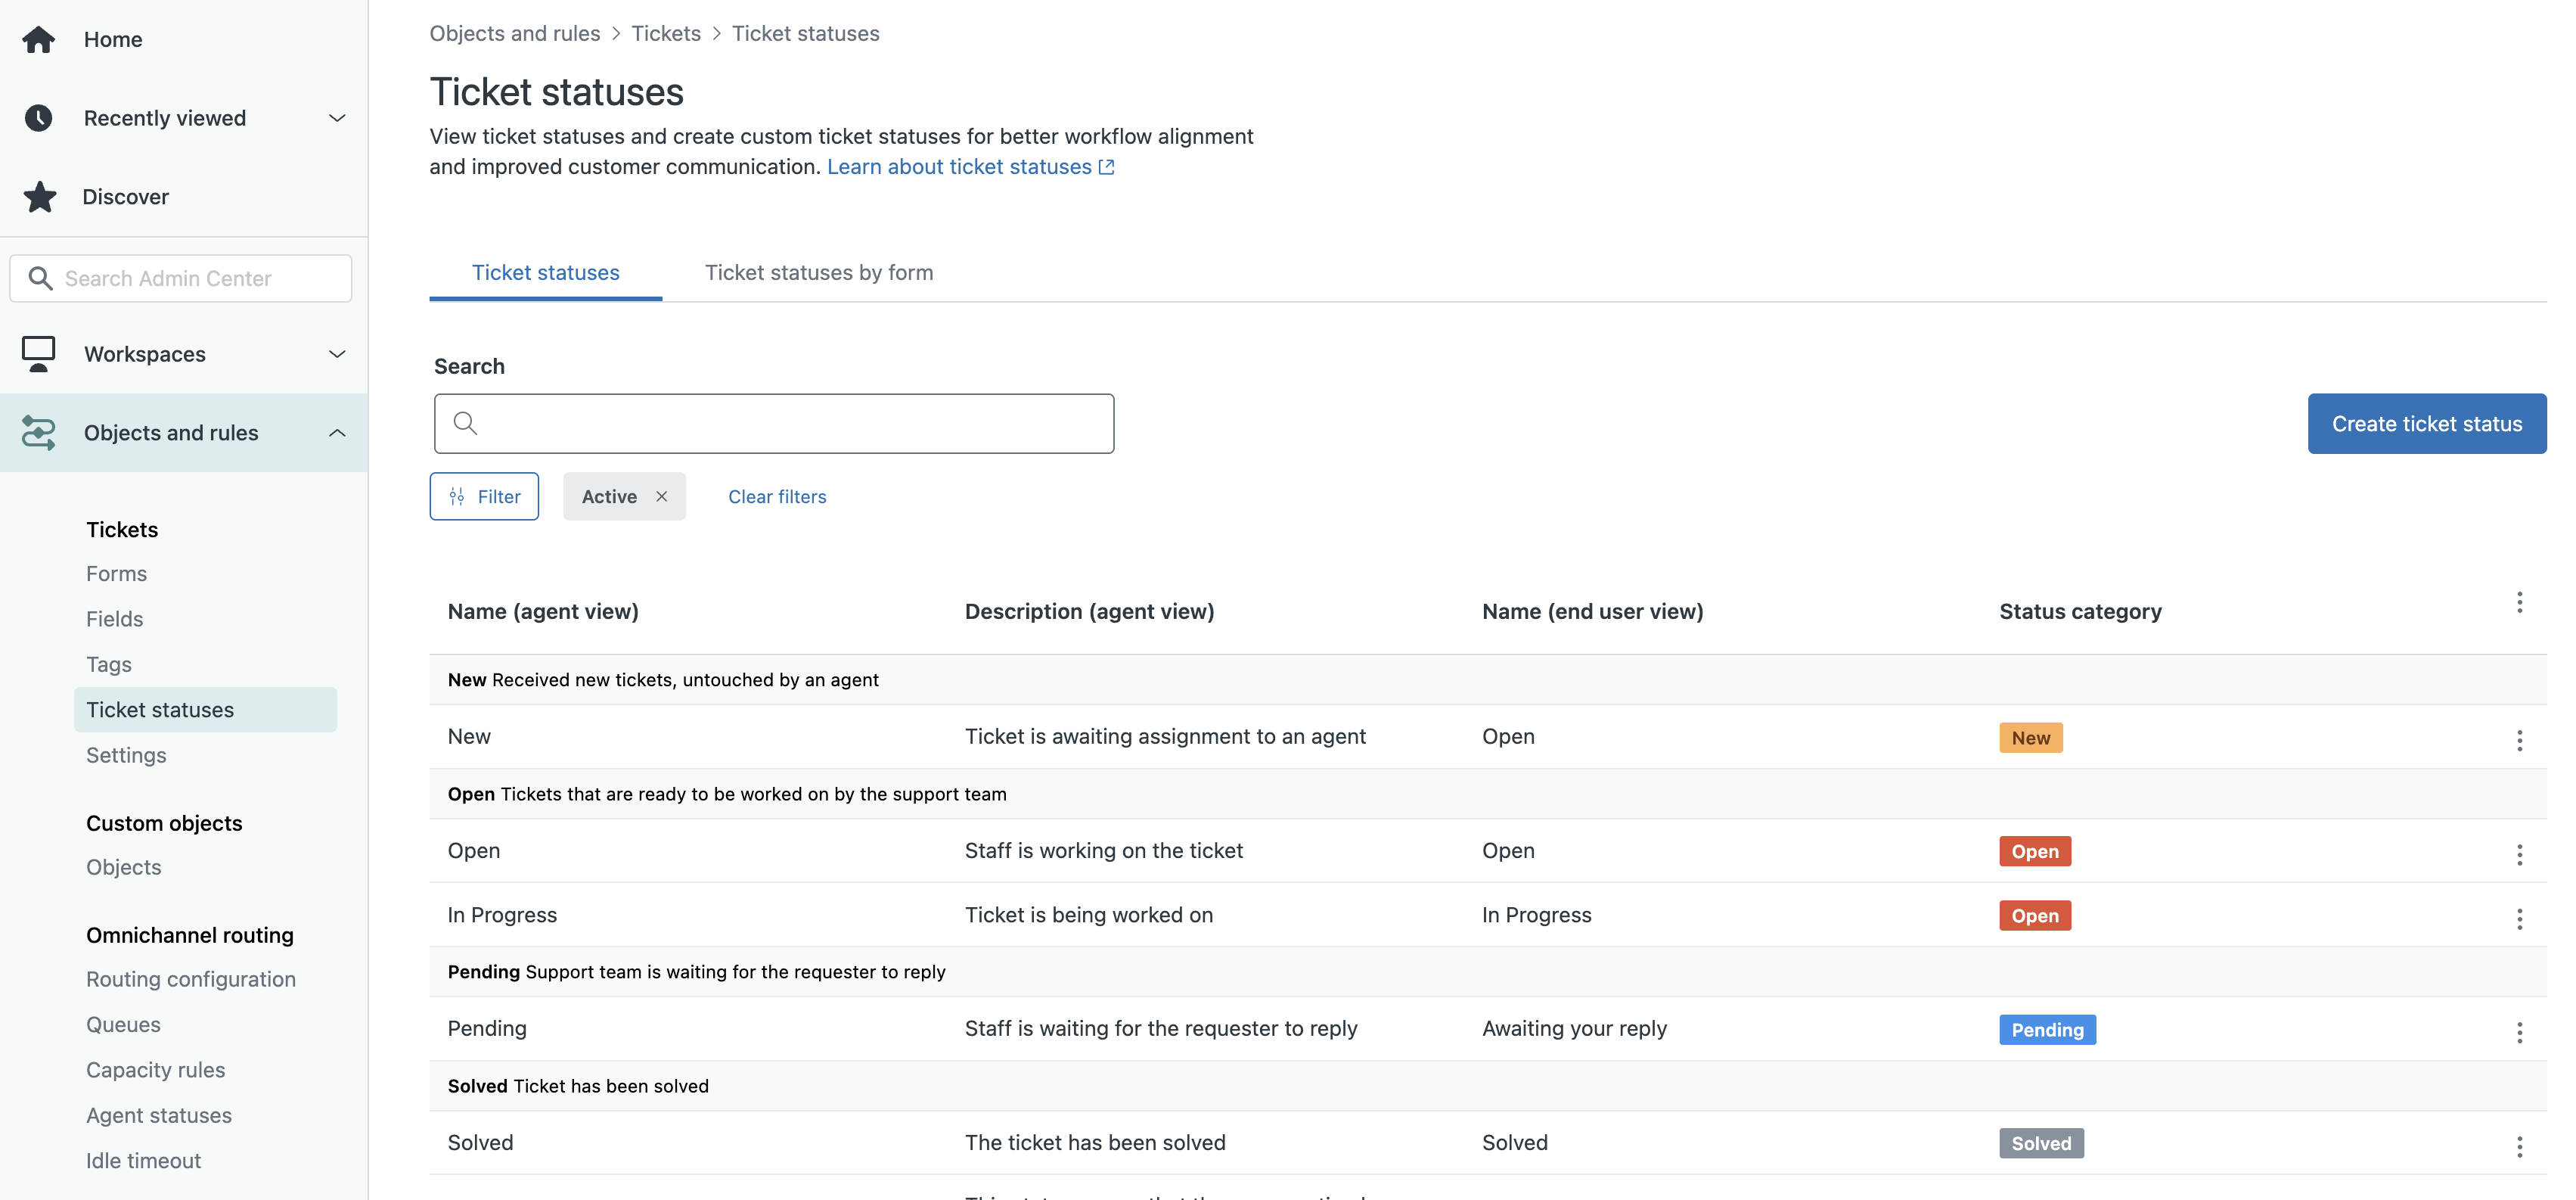
Creating a custom ticket status
- From the Objects and rules section, click on Ticket Statuses in the Tickets section
-
- Click on Create ticket status
-
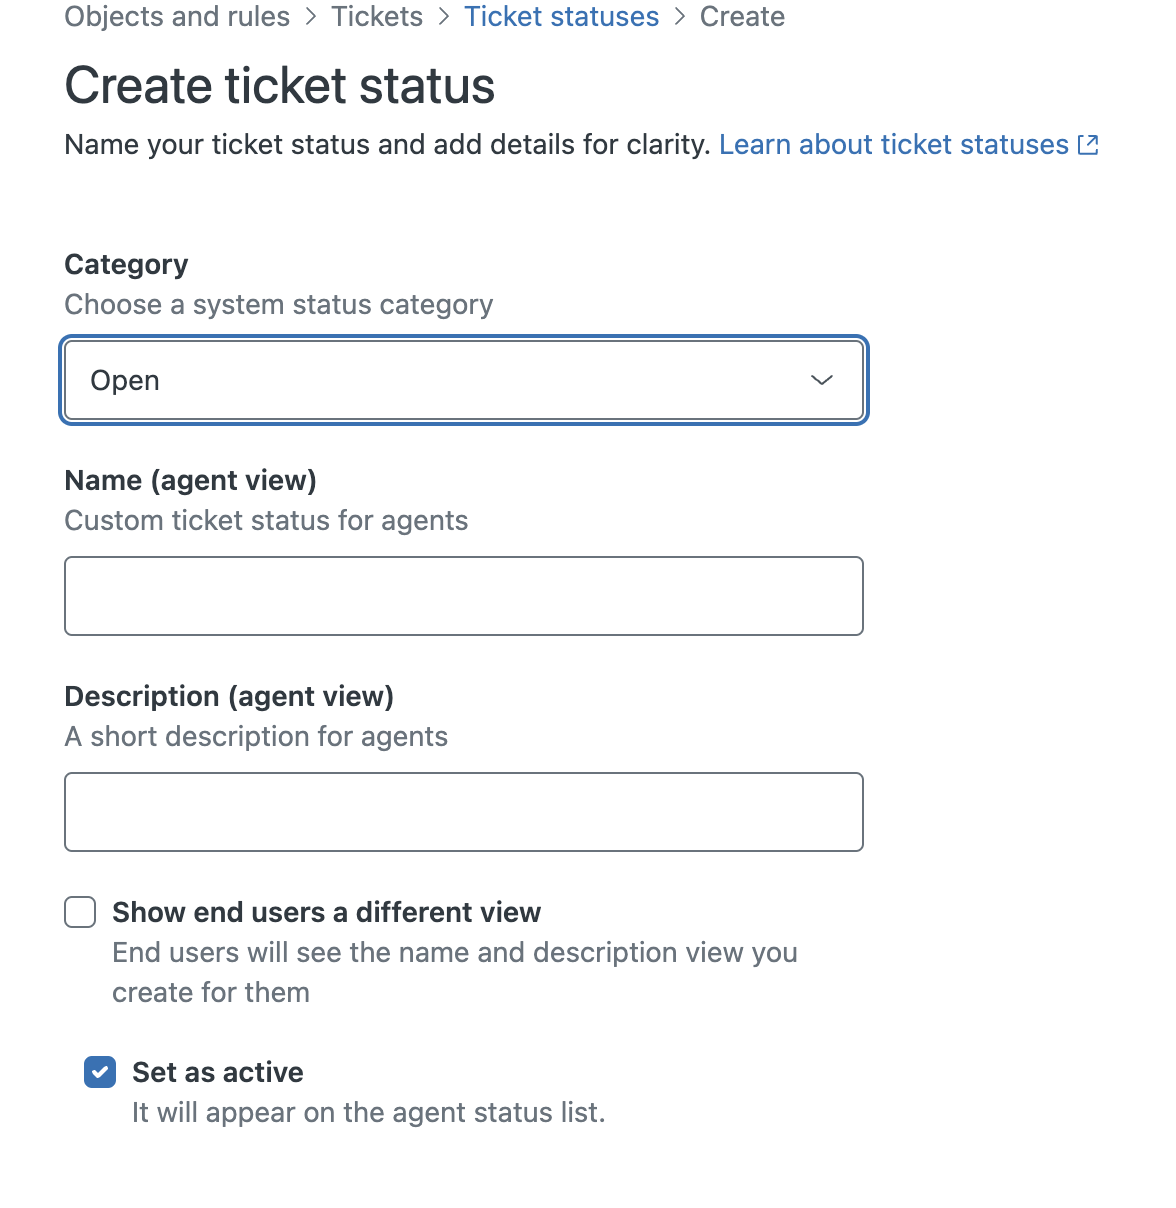
- Name your ticket status as "Handback to Askribe".
- Make sure Set as Active is checked
-

- Click on Save
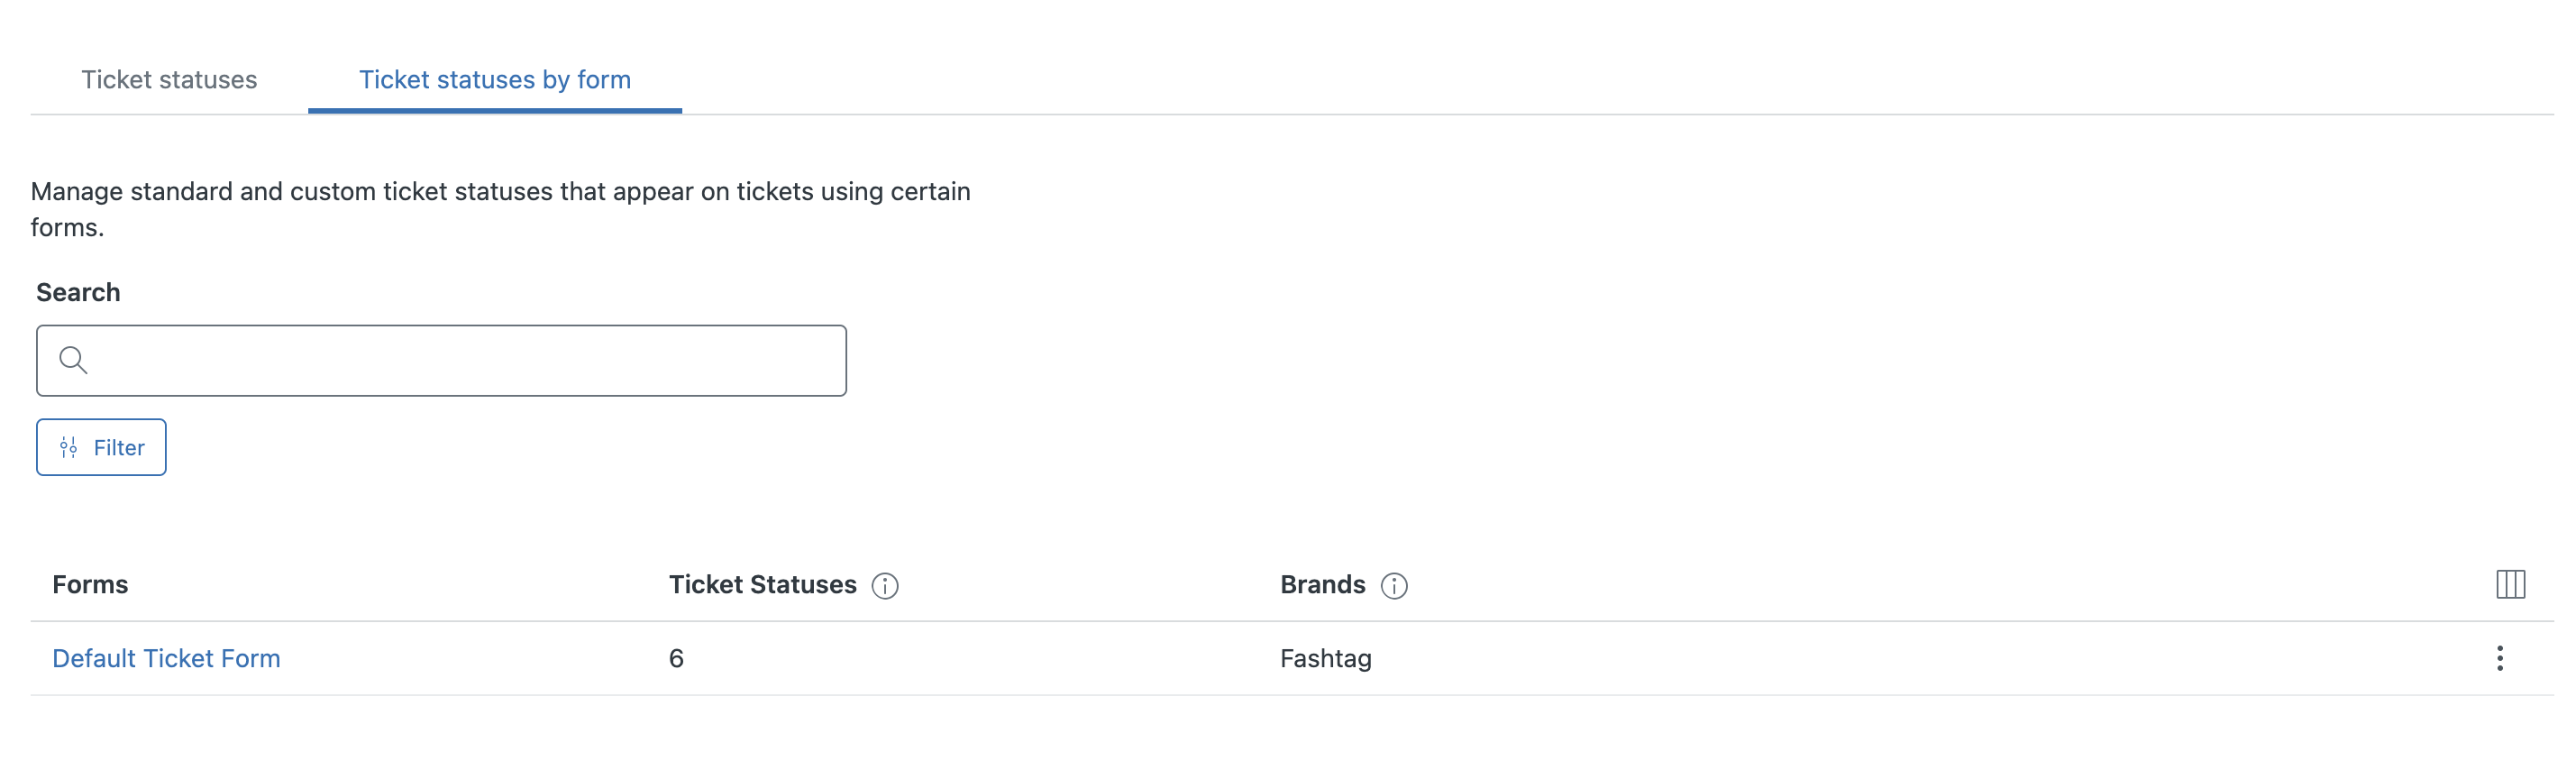
- Now, select Ticket statuses by form
-
- For each of your forms, select the form, check the Handback to Askribe checkbox from the Solved section and click on Save
-
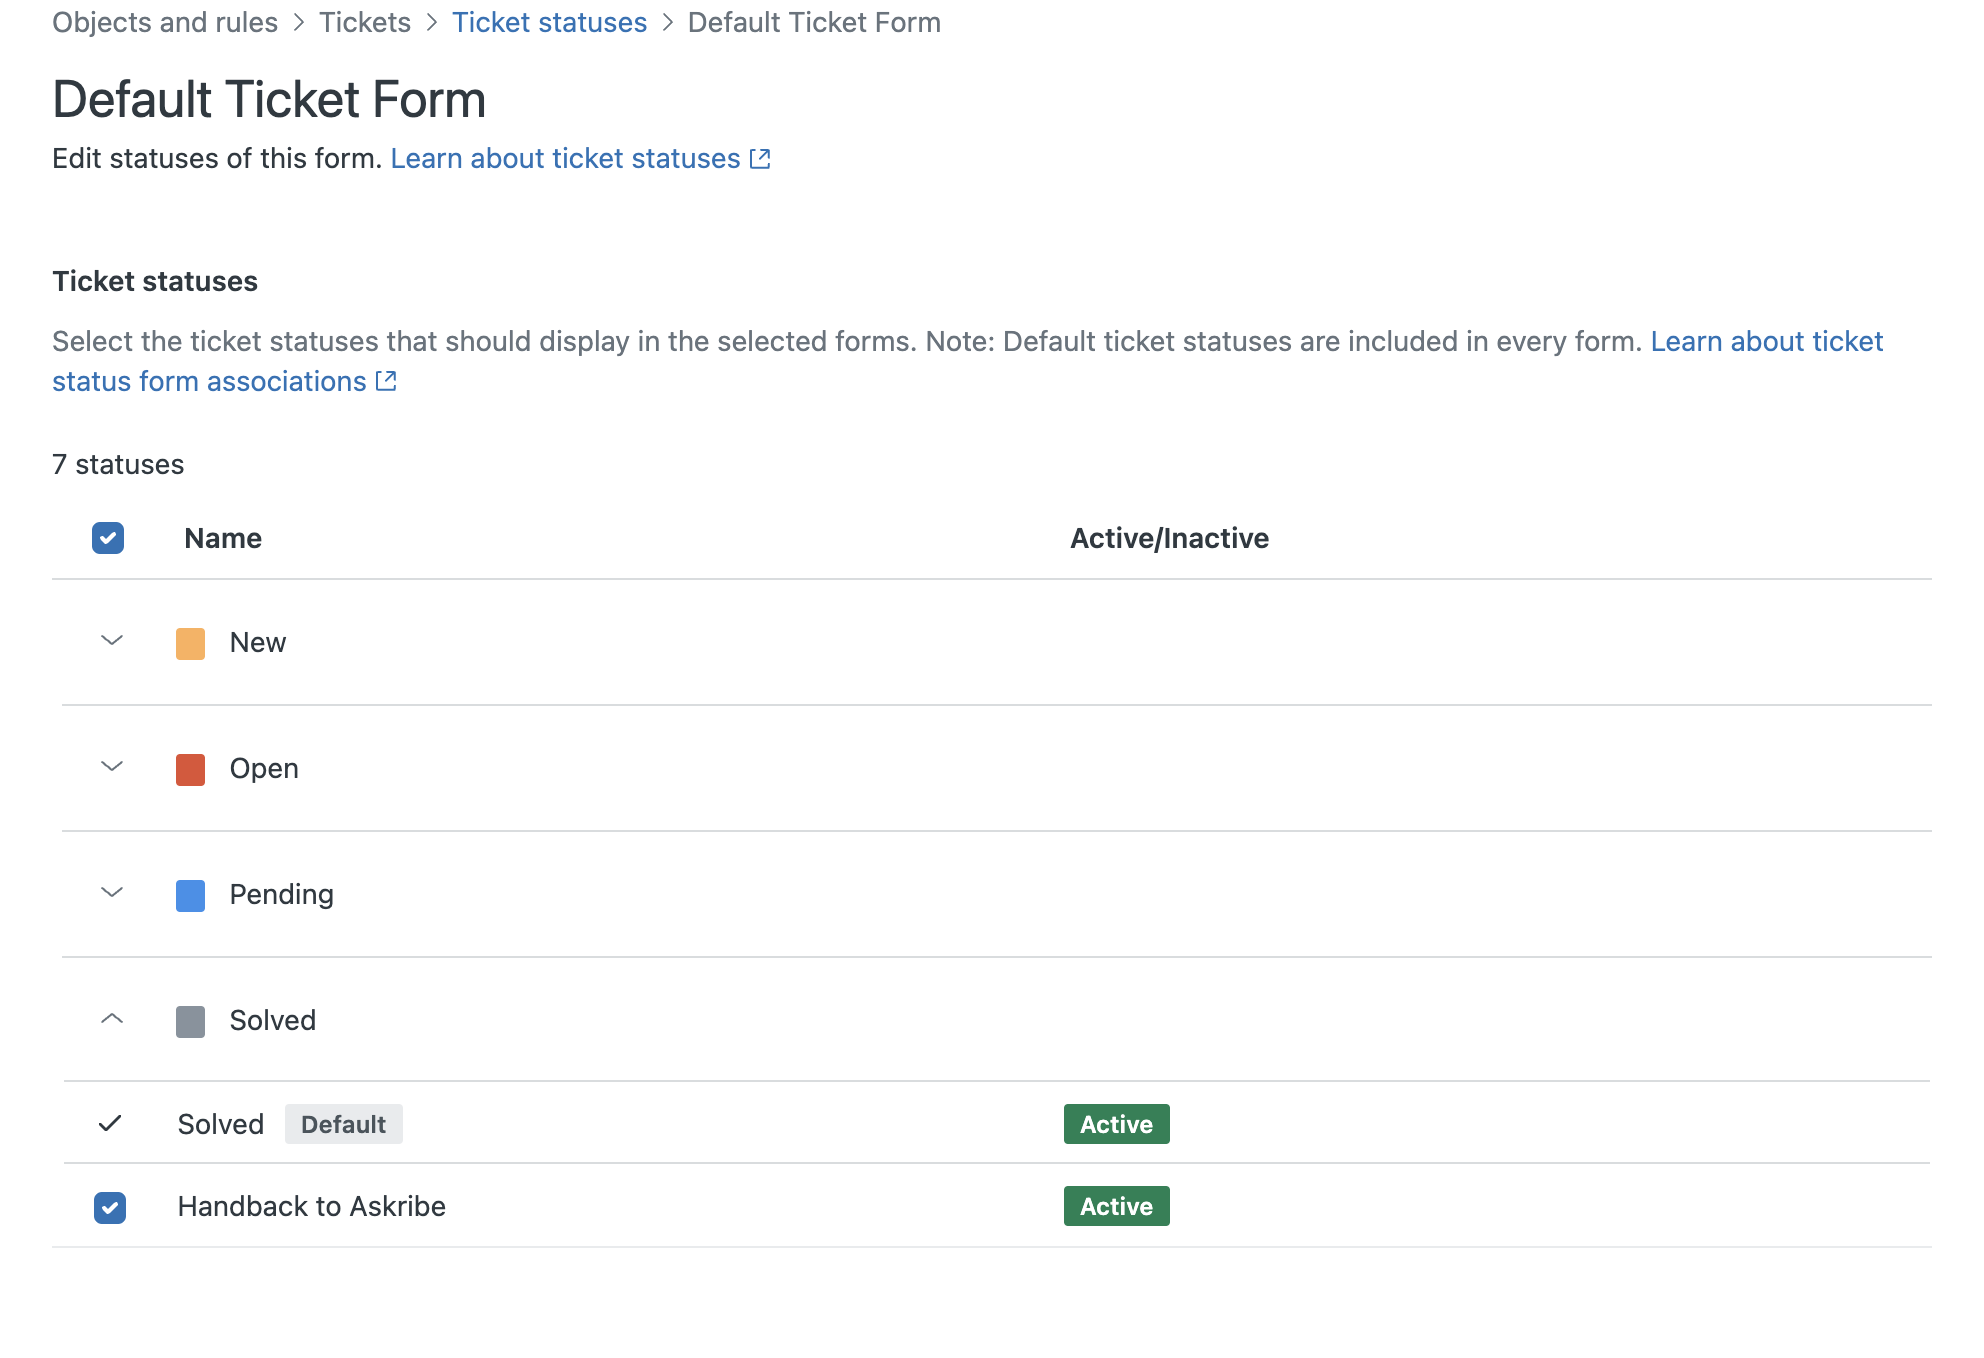
- You have now successfully created a custom ticket status
-
Create a Ticket Webhook
- From the Apps and Integrations section, click on Webhooks in the Action and webhooks section
-

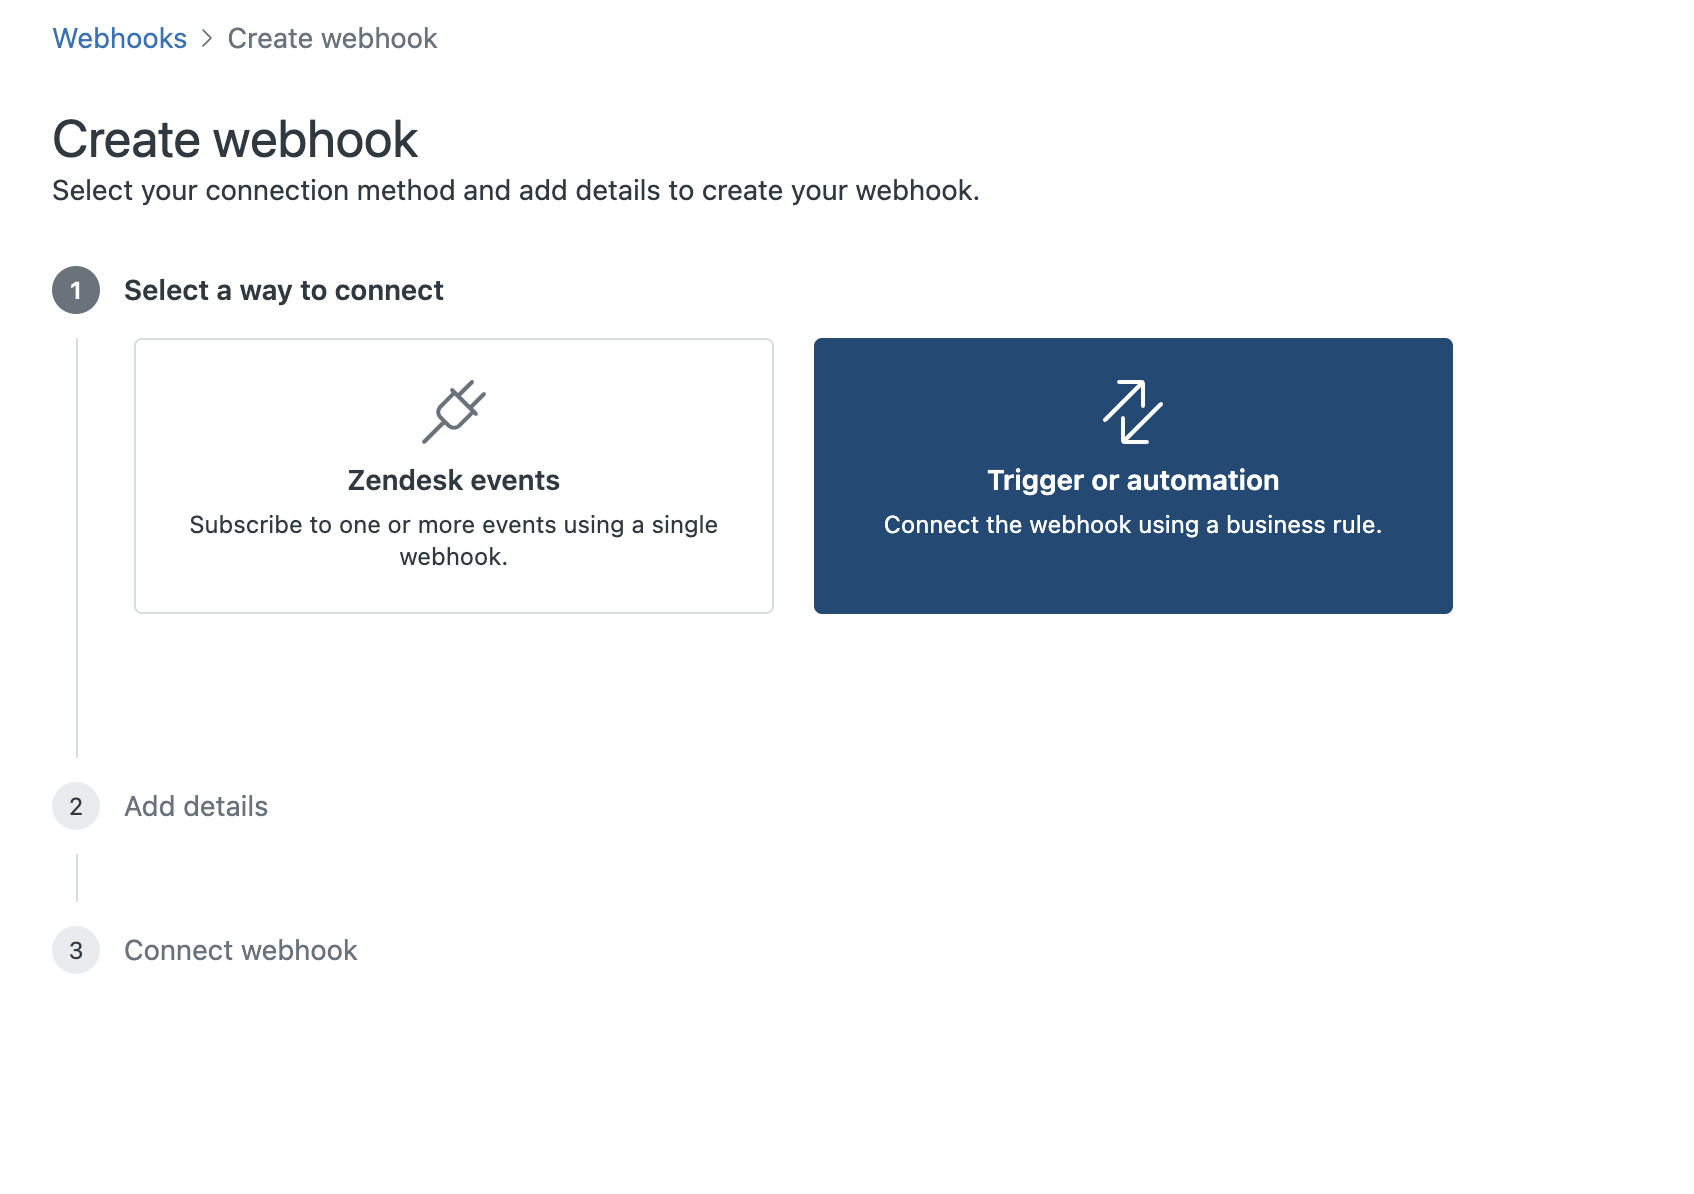
- Click on Create webhook
- Select Trigger or automation from the Select a way to connect panel and click on Next
-
- Name, your webhook as "Askribe webhook" and put
https://stage-askribe-askribe-ohlibf5r4a-el.a.run.app/api/v1/webhook/zendesk-sunshinein the URL field -
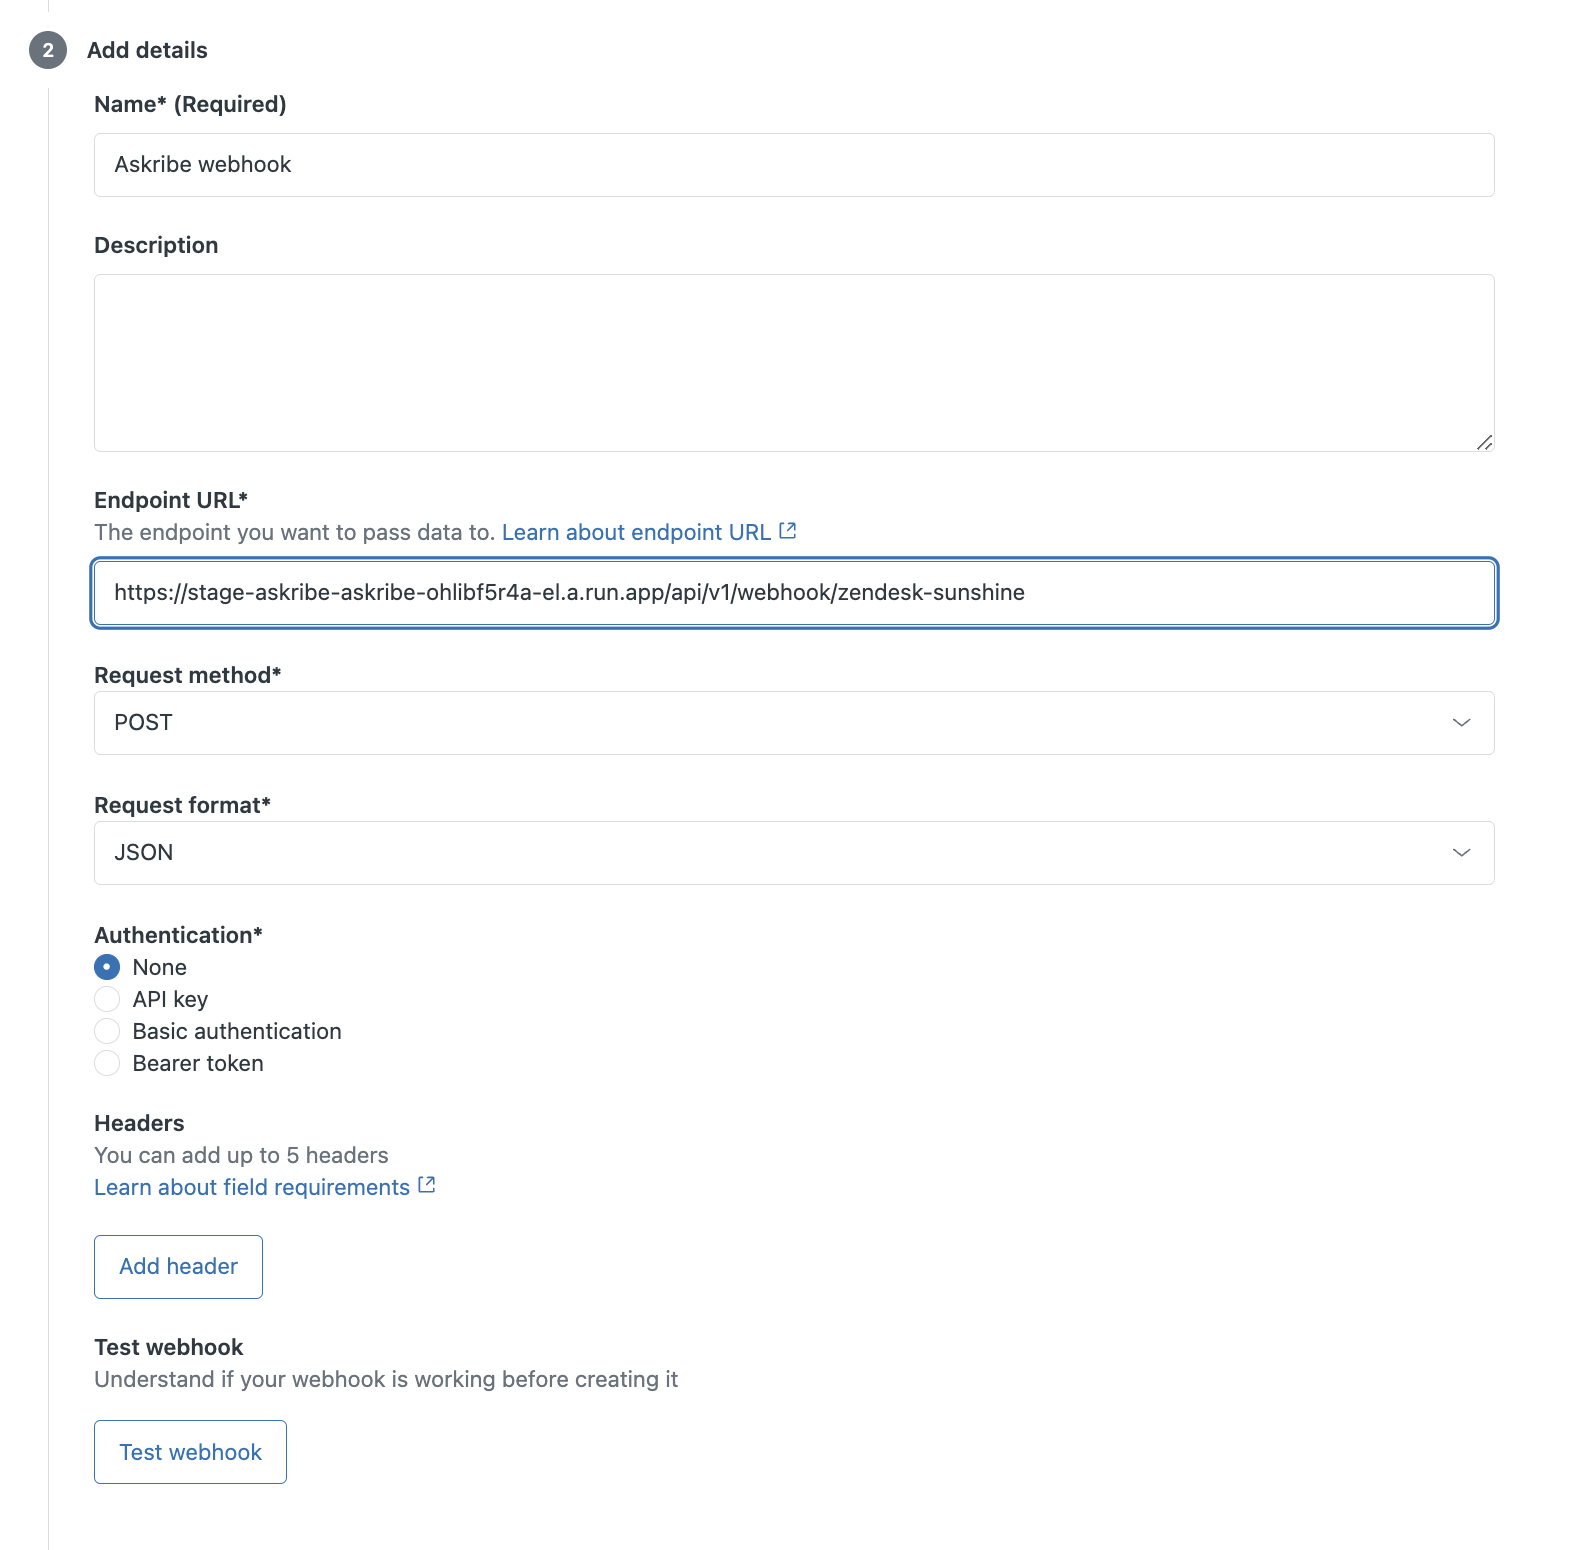
- Click on Test Webhook to test your webhook and click on Create webhook
- You have now successfully created a Ticket webhook
-
Creating a Conversation Closed trigger
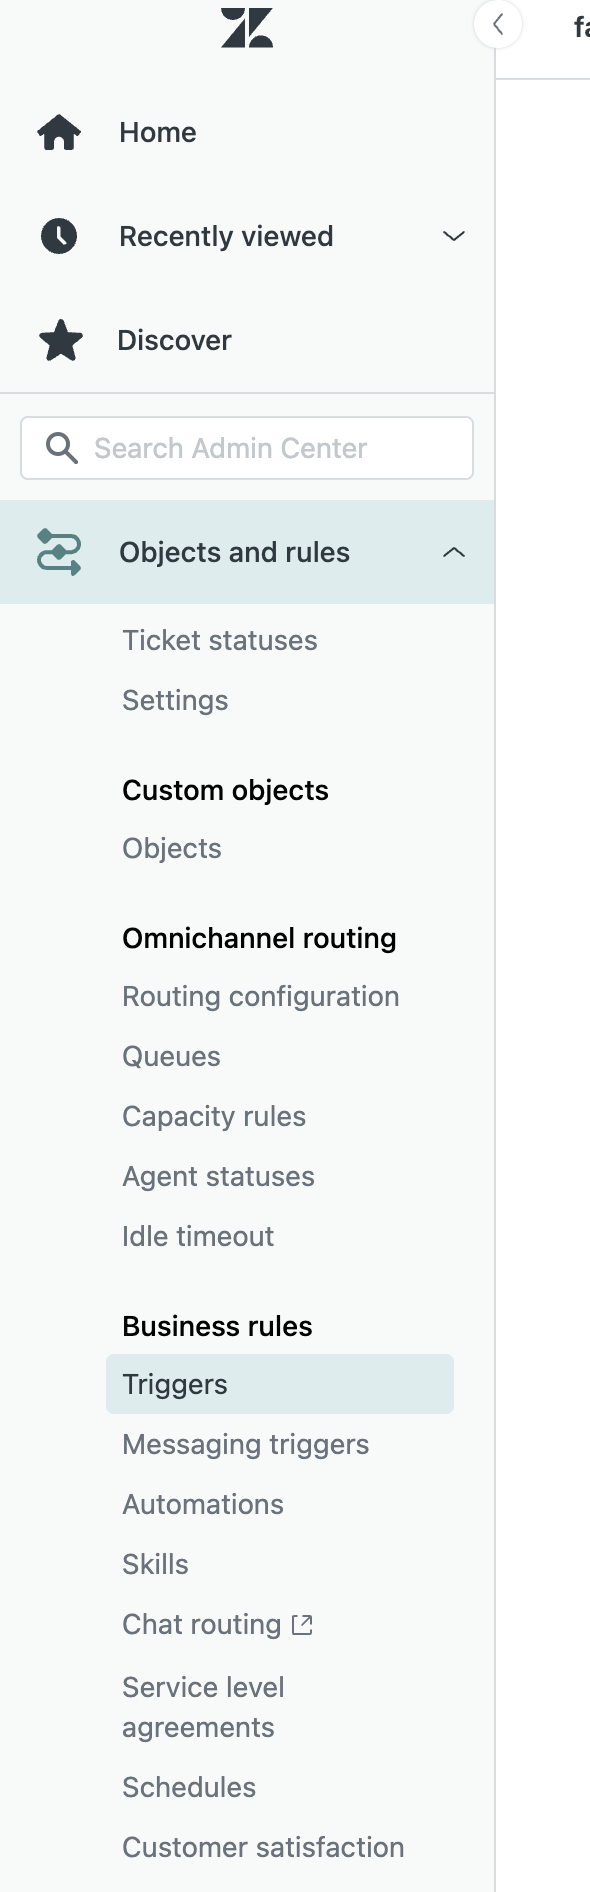
- From the Objects and rules section, click on Triggers in the Business Rules section
-
- Click on Create trigger button on the top right
- Name your trigger as "Conversation Closed Trigger" and select Notifications from the Trigger category dropdown
-

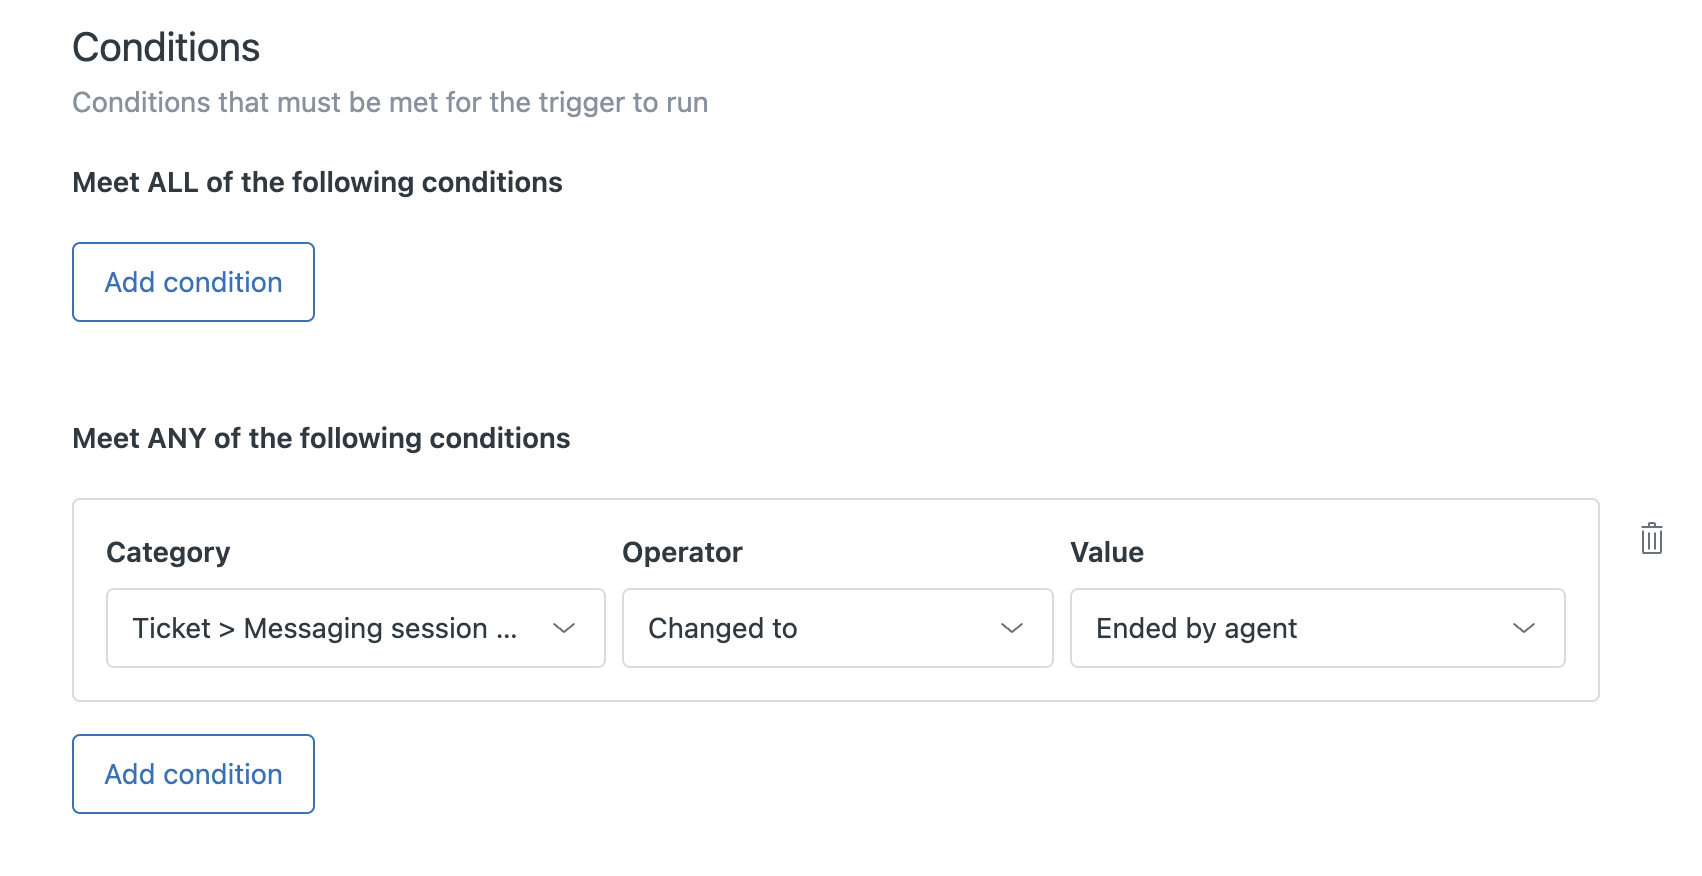
- In the conditions section, set you condition as Ticket > Messaging session ended reason | Changed to | Ended by agent
-
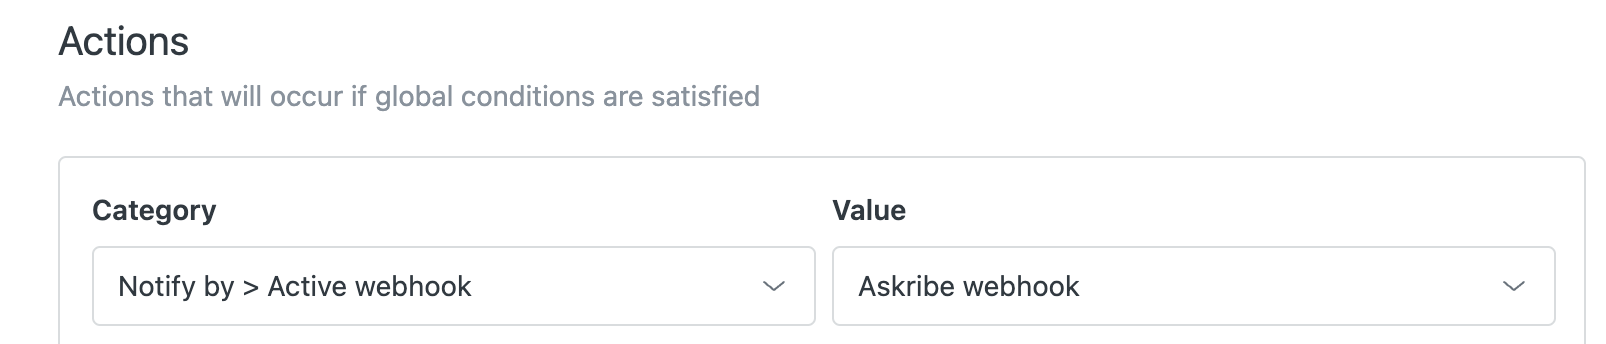
- In the actions section, click on "Add action"
- Select Notify by > Active webhook from the Category dropdown and Askribe webhook in the Value dropdown
-
- Paste the following JSON in the payload box
{
   "ticketAccount": "{{ticket.account}}",
   "ticketExternalId": "{{ticket.external_id}}",
   "ticketEncodedId": "{{ticket.encoded_id}}",
   "ticketId": "{{ticket.id}}",
   "ticketOrgExternalId": "{{ticket.organization.external_id}}",
   "ticketOrgId": "{{ticket.organization.id}}",
   "ticketStatus": "{{ticket.status}}",
   "ticketStatusCategory": "{{ticket.status_category}}",
   "ticketRequesterExternalId": "{{ticket.requester.external_id}}",
   "ticketRequesterId": "{{ticket.requester.id}}",
   "customWebhookEventType": "CONVERSATION_CLOSED"
}
-
Creating a Ticket Solved trigger
- From the Objects and rules section, click on Triggers in the Business Rules section
-
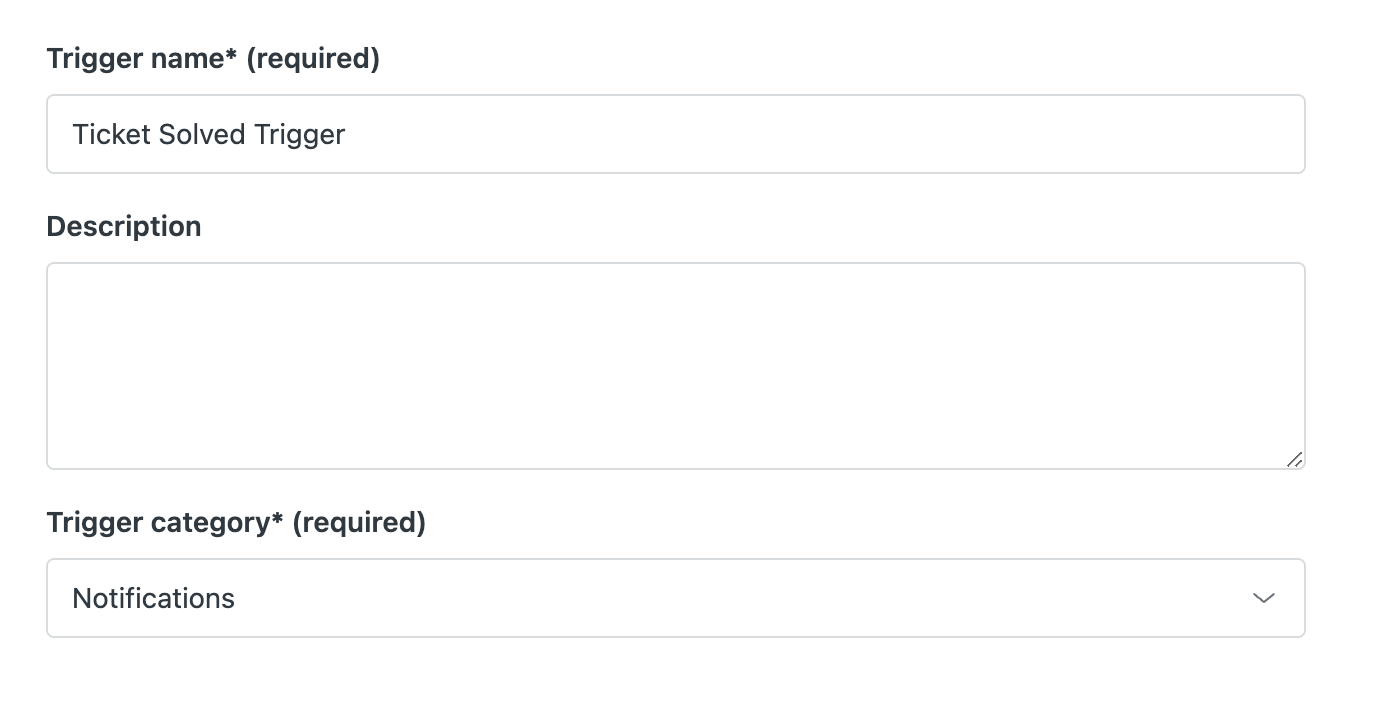
- Click on Create trigger button on the top right
- Name your trigger as "Ticket Solved Trigger" and select Notifications from the Trigger category dropdown
-
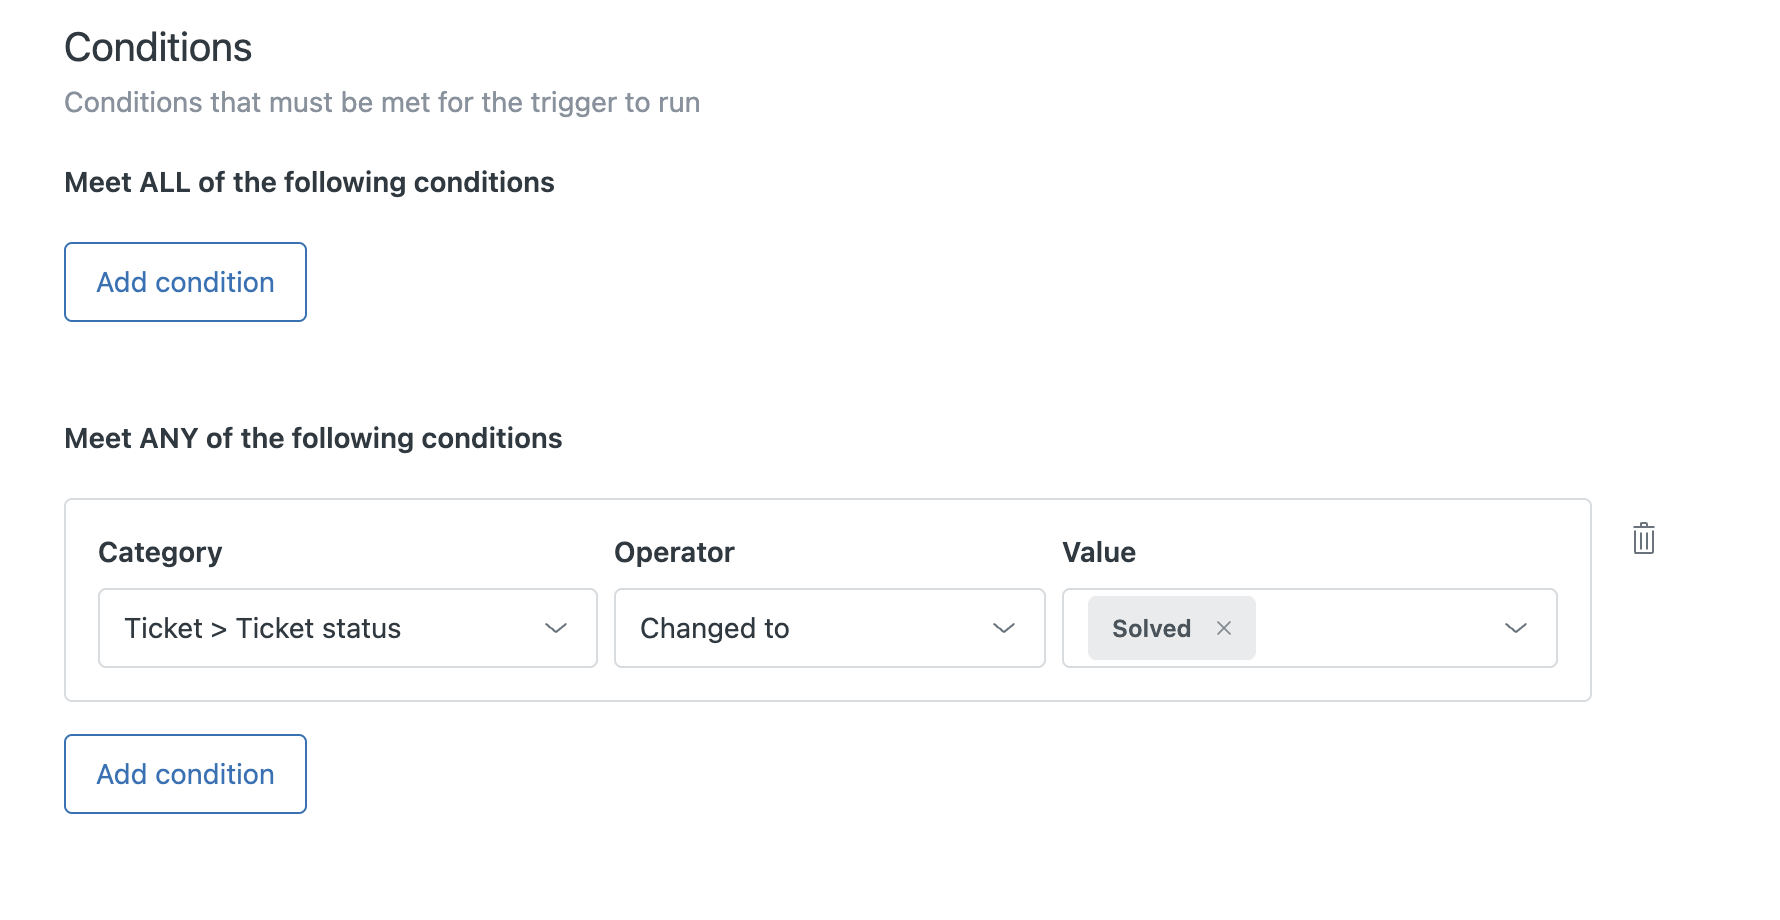
- In the conditions section, set you condition as Ticket > Ticket Status | Changed to | Solved
-
- In the actions section, click on "Add action"
- Select Notify by > Active webhook from the Category dropdown and Askribe webhook in the Value dropdown
-

- Paste the following JSON in the payload box
{
   "ticketAccount": "{{ticket.account}}",
   "ticketExternalId": "{{ticket.external_id}}",
   "ticketEncodedId": "{{ticket.encoded_id}}",
   "ticketId": "{{ticket.id}}",
   "ticketOrgExternalId": "{{ticket.organization.external_id}}",
   "ticketOrgId": "{{ticket.organization.id}}",
   "ticketStatus": "{{ticket.status}}",
   "ticketStatusCategory": "{{ticket.status_category}}",
   "ticketRequesterExternalId": "{{ticket.requester.external_id}}",
   "ticketRequesterId": "{{ticket.requester.id}}",
   "customWebhookEventType": "TICKET_SOLVED"
}
-
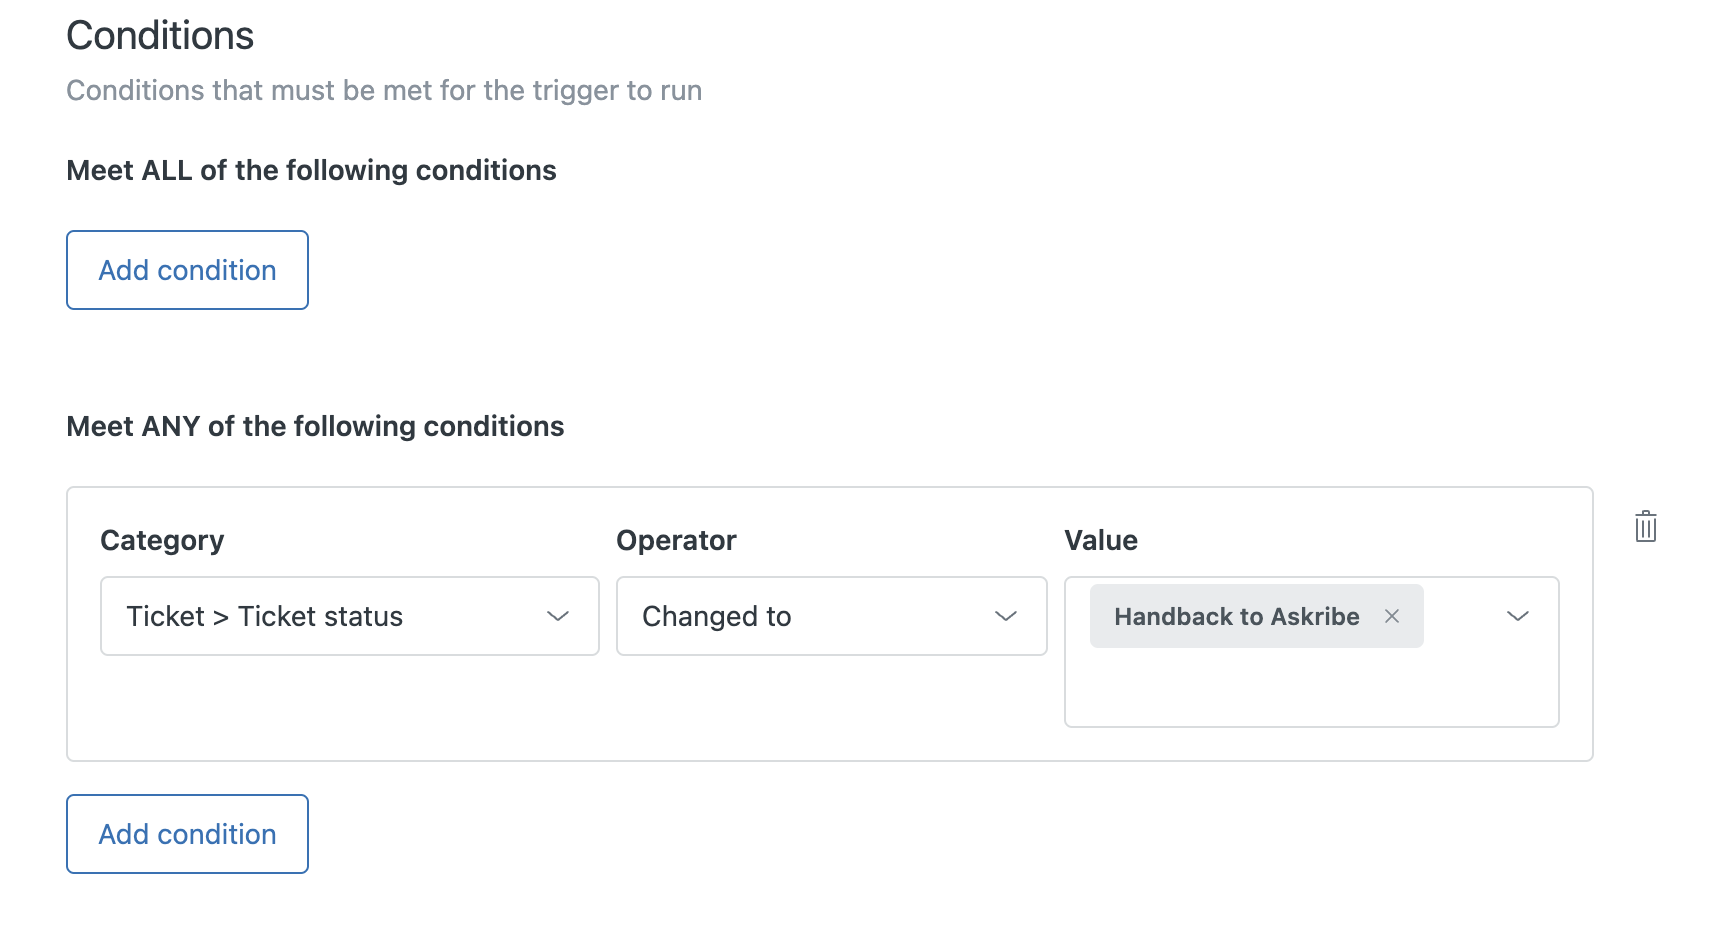
Creating a Ticket Handed back to Askribe trigger
- From the Objects and rules section, click on Triggers in the Business Rules section
-
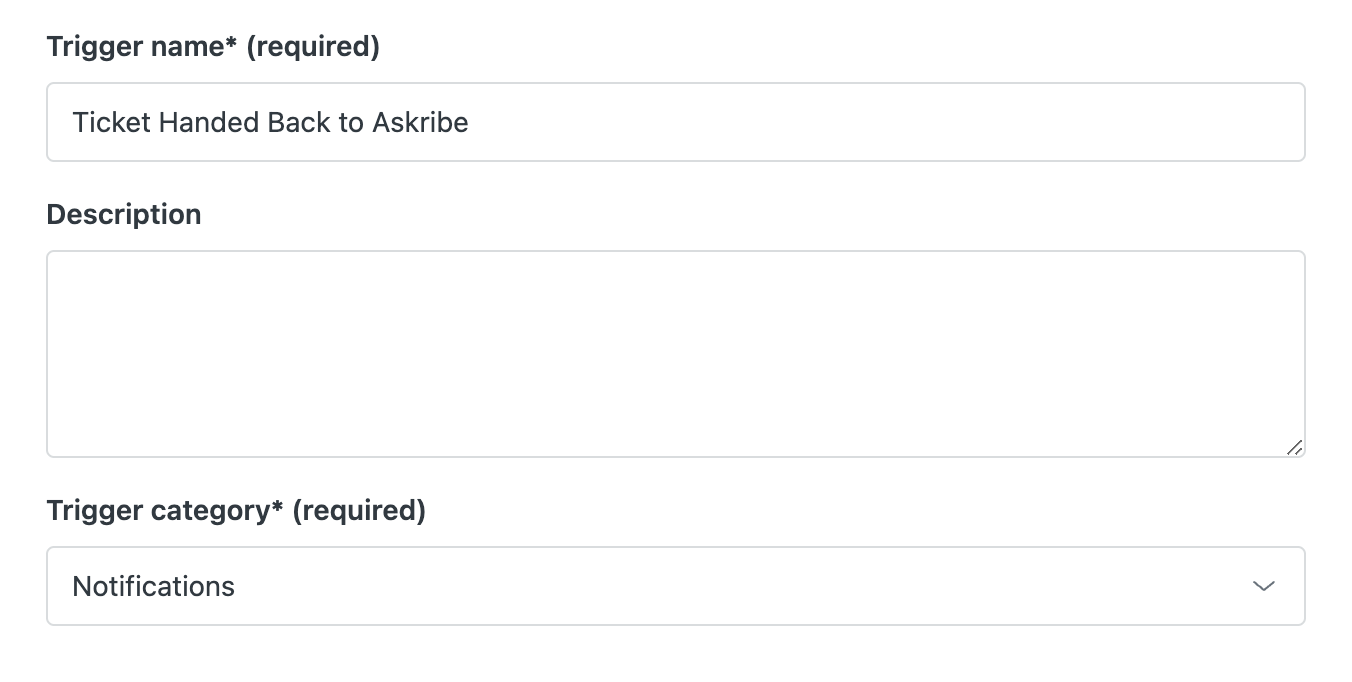
- Click on Create trigger button on the top right
- Name your trigger as "Ticket Handed back to Askribe" and select Notifications from the Trigger category dropdown
-
- In the conditions section, set you condition as Ticket > Ticket Status | Changed to | Handback to Askribe
-
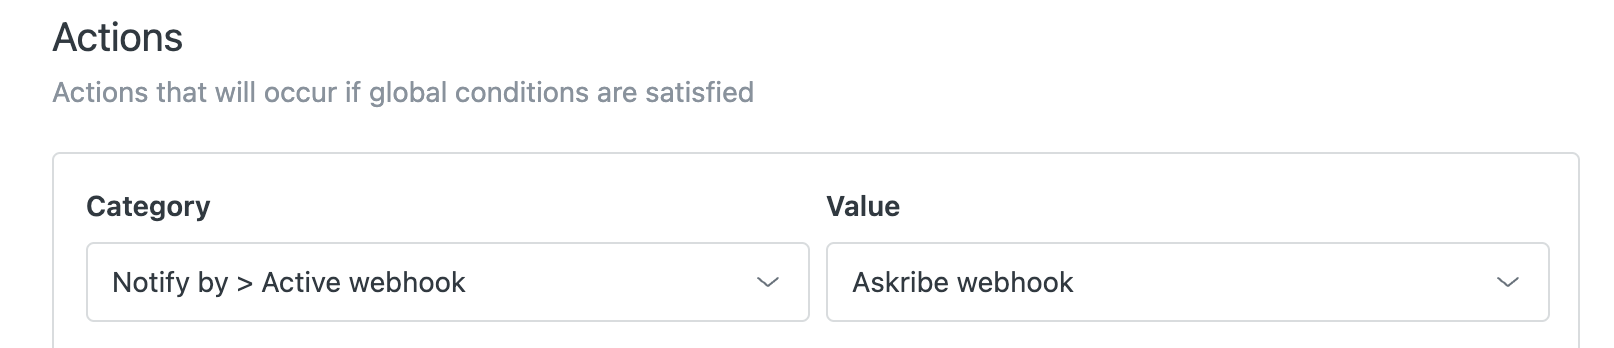
- In the actions section, click on "Add action"
- Select Notify by > Active webhook from the Category dropdown and Askribe webhook in the Value dropdown
-
- Paste the following JSON in the payload box
{
   "ticketAccount": "{{ticket.account}}",
   "ticketExternalId": "{{ticket.external_id}}",
   "ticketEncodedId": "{{ticket.encoded_id}}",
   "ticketId": "{{ticket.id}}",
   "ticketOrgExternalId": "{{ticket.organization.external_id}}",
   "ticketOrgId": "{{ticket.organization.id}}",
   "ticketStatus": "{{ticket.status}}",
   "ticketStatusCategory": "{{ticket.status_category}}",
   "ticketRequesterExternalId": "{{ticket.requester.external_id}}",
   "ticketRequesterId": "{{ticket.requester.id}}",
   "customWebhookEventType": "TICKET_HANDBACK"
}